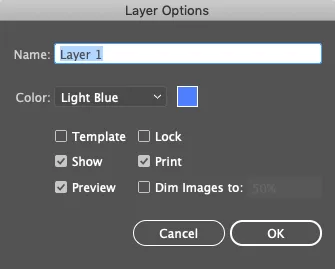
Sorting, organizing, naming, and keeping track of layers is tricky and often gets left behind. Usually, when we first start a project there is some semblance of order. Unfortunately, as it progresses, Adobe Illustrator layers often dissolve into a single chaotic free for all layer. Using Layer Options in Illustrator can help set up a system to manage your layers through the entire project.To access the Layer Options in Illustrator, double click on the layer and you will see something like this:

1. Name
Name your layers! Yes, really. I like to start out with a couple of layers like “Background” or “Sketch” or “Guides.” More often than not as the project progresses, I add random layers that make sense at the moment. However, I am lost when I open the file up the next time. Proper naming would help solve this problem.
2. Color
There are a good amount of colors (from ochre to olive) you can choose from or you could pick a custom color. The color of the layer corresponds with the color of the bounding box of each object on that layer. This is helpful when trying to distinguish layers without having to open and wade through the layers window.
3. Template
This is a super helpful tool that I wish someone had told me about sooner. It comes in handy when you are drawing over a template or scanned sketch. When you select this option, the Lock, Show, and Preview options are automatically turned on. The Dim Images to option is also automatically selected, but you are able to choose how much the image is dimmed. The Print layer is deselected, so this layer will be visible on screen but will never actually appear in a print.
4. Show
Same as the main layers window, you can only see a layer when this is clicked on.
5. Preview
The best way I can explain this is as that it is the opposite of outline mode. This is what we’re used to seeing most of the time and shows a full rendering of the illustration, not just the vector outlines and points.
6. Lock
This does the same thing as the Toggle Lock checkbox in the main layers window. If a layer is locked, no object within it can be moved.
7. Print
This lets you decide whether this layer will appear in a print. The layer will still appear on your screen as per usual but if it is not checked on, it will not end up printing. This is helpful if you want to leave yourself little notes and references or for initial sketches.
8. Dim images
This option will fade down all the objects to the percentage specified in the little input box. This is also a great tool for tracing over sketches and you don’t have to manually and individually modify the opacity of each object.


